8997 2021-02-28 2021-05-08
RocketMq源码阅读系列开篇之作,本文将介绍一些看似与源码无关,但却实际贯穿全流程的核心概念、知识储备、源码分析。搭楼还需地基稳,多说无益,开始吧!
一、common-cli的使用
apache common-cli工具包在大部分开源工具中非常常见,它的大致作用是避免程序员重复写一些命令行参数读入输出的问题,它能让你代码的命令行输入输出变得非常正规,已达到类似于mysql、redis、bash的命令行输入输出格式。
1、目标格式
下面是一段提示代码
Missing required options: h, u, p, s, d
usage: scp -help
 -d,--dst_path <arg>   the dstPath of remote
 -h,--host <ipv4 or ipv6>     the host of remote server
 -help                 usage help
 -P,--port <arg>       the port of remote server
 -p,--password <arg>   the password of remote server
 -s,--src_path <arg>   the srcPath of local
 -u,--user <arg>       the user of remote server
2、示例代码
下面是一段演示代码,核心部分不是很难-复杂,这里就不展开介绍了
/**
 * 参考链接: https://www.jianshu.com/p/c3ae61787a42
 *
 * @author HK
 * @date 2021-03-09 10:26
 */
public class ScpCmdTest {

    private static String HELP_STRING = null;

    private static Options options = new Options();

    public static void main(String[] args) {
        initCliArgs(new String[]{"-u", "hk",
                "--password", "hk",
                "-h", "localhost",
                "--dst_path", "127.0.0.1",
                "-p", "8099",
               "--src_path", "/xiaokui"
        });
    }

    private static void initCliArgs(String[] args) {
        CommandLineParser commandLineParser = new DefaultParser();
        // help
        options.addOption("help", "usage help");
        // host
        options.addOption(Option.builder("h").argName("ipv4 or ipv6").required().hasArg(true).longOpt("host").type(String.class).desc("the host of remote server").build());
        // port
        options.addOption(Option.builder("P").hasArg(true).longOpt("port").type(Short.TYPE).desc("the port of remote server").build());
        // user
        options.addOption(Option.builder("u").required().hasArg(true).longOpt("user").type(String.class).desc("the user of remote server").build());
        // password
        options.addOption(Option.builder("p").required().hasArg(true).longOpt("password").type(String.class).desc("the password of remote server").build());
        // srcPath
        options.addOption(Option.builder("s").required().hasArg(true).longOpt("src_path").type(String.class).desc("the srcPath of local").build());
        // dstPath
        options.addOption(Option.builder("d").required().hasArg(true).longOpt("dst_path").type(String.class).desc("the dstPath of remote").build());

        CommandLine commandLine = null;
        try {
            commandLine = commandLineParser.parse(options, args);
        } catch (ParseException e) {
            System.out.println(e.getMessage() + "\n" + getHelpString());
            System.exit(0);
        }
        if (commandLine.hasOption("h")) {
            System.out.println("has h:" + commandLine.getOptionValue("h"));
        }
        if (commandLine.hasOption("host")) {
            System.out.println("has host:" + commandLine.getOptionValue("host"));
        }
        if (commandLine.hasOption("-h")) {
            System.out.println("has -h:" + commandLine.getOptionValue("-h"));
        }
        if (commandLine.hasOption("--host")) {
            System.out.println("has --host:" + commandLine.getOptionValue("--host"));
        }
        if (commandLine.hasOption("hh")) {
            System.out.println("has hh:" + commandLine.getOptionValue("hh"));
        } else {
            System.out.println("has not hh:" + commandLine.getOptionValue("hh"));
        }
        System.out.println("输入正确:" + commandLine);
    }

    private static String getHelpString() {
        if (HELP_STRING == null) {
            HelpFormatter helpFormatter = new HelpFormatter();
            ByteArrayOutputStream byteArrayOutputStream = new ByteArrayOutputStream();
            PrintWriter printWriter = new PrintWriter(byteArrayOutputStream);
            helpFormatter.printHelp(printWriter, HelpFormatter.DEFAULT_WIDTH, "scp -help", null,
                    options, HelpFormatter.DEFAULT_LEFT_PAD, HelpFormatter.DEFAULT_DESC_PAD, null);
            printWriter.flush();
            HELP_STRING = new String(byteArrayOutputStream.toByteArray());
            printWriter.close();
        }
        return HELP_STRING;
    }
}
二、logging的使用
在RocketMq的源码中,虽然使用了slf4j,但是是在slf4j之上包装了一层,这样会导致日志输出会丢失一些原始信息,比如最初的类信息、行信息(可自行实验)。这里列举几个比较容易搞混的点,如下
1、日志输出的格式
### 一些常见的
%m 输出代码中指定的消息
%p 输出优先级,即DEBUG,INFO,WARN,ERROR,FATAL
%r 输出自应用启动到输出该log信息耗费的毫秒数
%c 就是定义该Logger的名字
%C 输出所属的类目,通常就是调用该Logger的类所在类的全名
%t 输出产生该日志事件的线程名
%n 输出一个回车换行符,Windows平台为"rn",Unix平台为"n"
%d 输出日志时间点的日期或时间,默认格式为ISO8601,也可以在其后指定格式,比如:%d{yyy MMM dd HH:mm:ss,SSS},输出类似:2002年10月18日 22:10:28,921
%l 输出日志事件的发生位置,包括类目名、发生的线程,以及在代码中的行数。举例:Testlog4.main(Test Log4.java:10)
2、是如何整合的
先说结论,slf4j是通过预留实现类StaticLoggerBinder来进行整合,通过这个类决定是加载log4j,还是logback等,具体见如下代码
/**
 * slf4j simple logging facade for java
 *
 * 参考链接:https://blog.csdn.net/Mr_Mocha/article/details/90482164
 *
 * slf4j-log4j12-x.x.x.jar是使用org.apache.log4j.Logger提供的驱动
 * slf4j-jdk14-x.x.x.jar是使用java.util.logging提供的驱动
 * slf4j-simple-x.x.x.jar直接绑定System.err
 * slf4j-jcl-x.x.x.jar是使用commons-logging提供的驱动
 * logback-classic-x.x.x.jar是使用logback提供的驱动
 *
 * slf4j实现原理:具体代码见类LoggerFactory的bind方法,大致过程如下
 * 1.先 findPossibleStaticLoggerBinderPathSet 方法尝试去加载类 org/slf4j/impl/StaticLoggerBinder.class
 * 2.如果出现 NoClassDefFoundError 则说明类路径下没有 第三方日志框架对 StaticLoggerBinder 的具体实现,slf4j输出找不到第三方适配,流程结束
 * 3.如果找得到 StaticLoggerBinder 的实现类,则 StaticLoggerBinder.getSingleton().getLoggerFactory(),返回第三方Logger的具体实现类
 * 4.这里还有一个分支,如果找到多个 StaticLoggerBinder 实现类,怎么办? 答案是能跑,但会出现红色警告 Class path contains multiple SLF4J bindings
 * 5.如果出现了两个相同包相同类,那么用的是哪个呢? 答案是只会加载第一个,并且正常运行,与export顺序有关(可以通过调换logback、log4j的导入顺序来使用不同架包)
 *
 * 浅谈两个jar包中包含完全相同的包名和类名的加载问题
 * 1.自定义两个jar包,其中包含相同包名和类名:与export的导入顺序有关。只会加载第一个,并且运行正常
 * 2.自定义jar和jdk包,其中包含相同的包名和类名:与export的导入顺序有关。同样是只会加载第一个,但是如果加载自定义的jar运行会报错。加载jdk正常。
 * @author HK
 * @date 2021-03-09 11:21
 */
public class LogTest {

    private static String STATIC_LOGGER_BINDER_PATH = "org/slf4j/impl/StaticLoggerBinder.class";

    static Logger logger = LoggerFactory.getLogger(LogTest.class);

    public static void main(String[] args) {
        LinkedHashSet staticLoggerBinderPathSet = new LinkedHashSet();

        try {
            ClassLoader loggerFactoryClassLoader = LoggerFactory.class.getClassLoader();
            Enumeration paths;
            if (loggerFactoryClassLoader == null) {
                paths = ClassLoader.getSystemResources(STATIC_LOGGER_BINDER_PATH);
            } else {
                paths = loggerFactoryClassLoader.getResources(STATIC_LOGGER_BINDER_PATH);
            }

            while(paths.hasMoreElements()) {
                URL path = (URL)paths.nextElement();
                staticLoggerBinderPathSet.add(path);
            }

        } catch (IOException var4) {
            Util.report("Error getting resources from path", var4);
        }
        System.out.println(staticLoggerBinderPathSet);

        System.out.println(StaticLoggerBinder.class);
        // logback=1.7.16    log4j=1.6
        System.out.println(StaticLoggerBinder.REQUESTED_API_VERSION);

        logger.info(LoggerFactory.getILoggerFactory().toString() + " " + logger.getName() + ": 这是一条测试消息");
        System.out.println("这是一条测试消息");
    }
}
三、定时任务
在RocketMQ中大量使用定时任务,我们来看下与此相关一些知识点。
1、Timer的使用
1、实现原理
单线程 + 最小堆任务消费队列(完全二叉平衡树,各根节点小于其子节点,且优先插入左侧节点,中序遍历可得排序结果集) + 轮询去堆顶取最小值执行任务。
不推荐使用,原因有二:
- 对耗时任务及多任务非常不友好
- 对于运行时异常不友好
后面有相关代码验证。
2、任务生产
/**
 * Schedule the specified timer task for execution at the specified
 * time with the specified period, in milliseconds.  If period is
 * positive, the task is scheduled for repeated execution; if period is
 * zero, the task is scheduled for one-time execution. Time is specified
 * in Date.getTime() format.  This method checks timer state, task state,
 * and initial execution time, but not period.
 *
 * @throws IllegalArgumentException if <tt>time</tt> is negative.
 * @throws IllegalStateException if task was already scheduled or
 *         cancelled, timer was cancelled, or timer thread terminated.
 * @throws NullPointerException if {@code task} is null
 */
// 外层scheduleXXX方法,本质都是对这个方法的调用
private void sched(TimerTask task, long time, long period) {
    if (time < 0)
        throw new IllegalArgumentException("Illegal execution time.");

    // Constrain value of period sufficiently to prevent numeric
    // overflow while still being effectively infinitely large.
    if (Math.abs(period) > (Long.MAX_VALUE >> 1))
        period >>= 1;

    // 对消费任务队列加锁,即生产者串行提交任务
    synchronized(queue) {
        if (!thread.newTasksMayBeScheduled)
            throw new IllegalStateException("Timer already cancelled.");
		// 再锁住具体的任务对象,对于消费者而言,关注的是具体的任务对象
        synchronized(task.lock) {
            if (task.state != TimerTask.VIRGIN)
                throw new IllegalStateException(
                    "Task already scheduled or cancelled");
            // 任务的下一次执行时间
            task.nextExecutionTime = time;
            // 执行周期
            task.period = period;
            // 任务状态
            task.state = TimerTask.SCHEDULED;
        }
		// 任务放入消费队列,等待消费线程消费
        queue.add(task);
        if (queue.getMin() == task)
            // 如果刚刚加入的任务位于堆顶,则唤醒在queue上wait的线程
            // 为什么是notify呢,因为消费线程主动调用了wait方法,只能由外部主动唤醒
            queue.notify();
    }
}
3、任务消费
// 调用构造方法时,默认会启动消费线程
public Timer(String name) {
    thread.setName(name);
    thread.start();
}

public void run() {
    try {
        mainLoop();
    } finally {
        // Someone killed this Thread, behave as if Timer cancelled
        synchronized(queue) {
            newTasksMayBeScheduled = false;
            queue.clear();  // Eliminate obsolete references
        }
    }
}

/**
     * The main timer loop.  (See class comment.)
     */
private void mainLoop() {
    // 轮询模式
    while (true) {
        try {
            TimerTask task;
            // 是否执行任务
            boolean taskFired;
            synchronized(queue) {
                // Wait for queue to become non-empty
                // 这里主动调用了wait方法,等待外部唤醒
                // 条件是队列无任务消费,且有能力去消费任务
                while (queue.isEmpty() && newTasksMayBeScheduled)
                    queue.wait();
                if (queue.isEmpty())
                    break; // Queue is empty and will forever remain; die

                // Queue nonempty; look at first evt and do the right thing
                // 当前时间 和 执行时间
                long currentTime, executionTime;
                // 取堆顶任务
                task = queue.getMin();
                synchronized(task.lock) {
                    if (task.state == TimerTask.CANCELLED) {
                        queue.removeMin();
                        continue;  // No action required, poll queue again
                    }
                    // 当前系统时间,精确到毫秒 ms
                    currentTime = System.currentTimeMillis();
                    // 任务的执行时间
                    executionTime = task.nextExecutionTime;
                    // 如果当前系统时间 大于等于 执行时间
                    // 假设任务执行时间为 20210101 11:11:11 111,而系统时间为20200101 22:22:22 222,则进入条件
                    if (taskFired = (executionTime<=currentTime)) {
                        // 移除已执行的一次性任务
                        if (task.period == 0) { // Non-repeating, remove
                            queue.removeMin();
                            task.state = TimerTask.EXECUTED;
                        } else { // Repeating task, reschedule
                            // 周期性任务
                            // 如果周期小于0,那么堆顶任务的下一次执行时间 = 当前时间 - 任务执行周期
                            // 如果周期大于0,那么堆顶任务的下一次执行时间 = 任务执行时间 + 任务执行周期
                            // 再重新调整最小堆任务
                            // 这里的代码逻辑具体表现为 schedule方法和scheduleAtFixedRate方法的细微差别
                            queue.rescheduleMin(
                                task.period<0 ? currentTime   - task.period
                                : executionTime + task.period);
                        }
                    }
                }
                // 如果不执行任务(执行时间 > 当前系统时间,即还未到执行时间),那么等待 执行时间 - 当前时间 毫秒
                // 等待时间到了(不一定非常精确,但误差可控),再次执行任务
                if (!taskFired) // Task hasn't yet fired; wait
                    queue.wait(executionTime - currentTime);
            }
            // 当前系统时间 大于等于 执行时间,执行任务
            // 我也觉得这个条件有点奇怪,不妨假设两个例子
            // 1.1 计划在2s后执行一个一次性任务,那么当前系统时间为 n,执行时间为 n + 1,此时taskFired = false,则 wait(2s)
            // 1.2 然后在进入循环,假设此时系统时间为 n + 3 > n + 2,此时taskFired = true,则执行任务
            // 2.1 计划计划执行一个周期性任务,n + 1后,每两秒执行一次
            // 2.2 初始化时系统时间可看做 n,小于执行时间n + 1,此时taskFired = false,则 wait 1s
            // 2.3 再如循环,此时系统时间为 n + 1.00001,大于执行时间 n + 1,此时taskFired = true,调整堆顶位置,然后执行任务,再循环
            if (taskFired)  // Task fired; run it, holding no locks
                task.run();
        } catch(InterruptedException e) {
        }
    }
}

// 假设 我希望有一个任务在 2021-02-02 10:50:00 开始运行,每个3分钟运行一次
// 但实际任务运行时间为 2021-02-02 10:55:00,那么区别如下

// schedule 不会补上之前的任务,它还是按照实际程序执行时间开始计算,即第一次打印为 2020-02-02 10:55:00,第二次为58
// 这里是 -period
public void schedule(TimerTask task, long delay, long period) {
    if (delay < 0)
        throw new IllegalArgumentException("Negative delay.");
    if (period <= 0)
        throw new IllegalArgumentException("Non-positive period.");
    sched(task, System.currentTimeMillis()+delay, -period);
}

// scheduleAtFixedRate 会补上之前的任务,即快速打印50和53(多执行了两次),然后再按正常的56、59运行下去
// 这里是 +period,具体区别我们这里就不跟,见源代码,不用这个类就对了
public void scheduleAtFixedRate(TimerTask task, long delay, long period) {
    if (delay < 0)
        throw new IllegalArgumentException("Negative delay.");
    if (period <= 0)
        throw new IllegalArgumentException("Non-positive period.");
    sched(task, System.currentTimeMillis()+delay, period);
}
4、代码验证
- 验证schedule和scheduleAtFixedRate的区别。
static SimpleDateFormat sdf = new SimpleDateFormat("yyyy-MM-dd HH:mm:ss");

private static void test1() {
    // 测试schedule、scheduleAtFixedRate的区别
    Timer timer = new Timer("定时任务timer", false);
    System.out.println("main当前时间为:" + sdf.format(new Date()));
    timer.schedule(new TimerTask() {
        @Override
        public void run() {
            System.out.println("schedule当前时间为:" + sdf.format(new Date()));
        }
    }, new Date(System.currentTimeMillis() + -2 * 1000), 5 * 1000);

    timer.scheduleAtFixedRate(new TimerTask() {
        @Override
        public void run() {
            System.out.println("scheduleAtFixedRate当前时间为:" + sdf.format(new Date()));
        }
    }, new Date(System.currentTimeMillis() + -2 * 1000), 5 * 1000);
}

// 输出如下,由此可知 schedule 会忽略传入时间作为起始值,而将当前时间作为开始值
// 而 scheduleAtFixedRate 会在调用时打印一次,并到下一个循环步入正轨
main当前时间为:2021-03-21 17:53:27,期望时间应为 17:53:25

schedule当前时间为:2021-03-21 17:53:27
scheduleAtFixedRate当前时间为:2021-03-21 17:53:27
scheduleAtFixedRate当前时间为:2021-03-21 17:53:30

schedule当前时间为:2021-03-21 17:53:32
scheduleAtFixedRate当前时间为:2021-03-21 17:53:35

schedule当前时间为:2021-03-21 17:53:37
scheduleAtFixedRate当前时间为:2021-03-21 17:53:40

schedule当前时间为:2021-03-21 17:53:42
scheduleAtFixedRate当前时间为:2021-03-21 17:53:45

schedule当前时间为:2021-03-21 17:53:47
scheduleAtFixedRate当前时间为:2021-03-21 17:53:50

schedule当前时间为:2021-03-21 17:53:52
scheduleAtFixedRate当前时间为:2021-03-21 17:53:55

schedule当前时间为:2021-03-21 17:53:57
scheduleAtFixedRate当前时间为:2021-03-21 17:54:00
- 验证对于耗时任务及多任务不友好。
private static void test2() {
    // 测试对耗时任务及多任务不友好
    Timer timer = new Timer("定时任务timer", false);
    System.out.println("main当前时间为:" + sdf.format(new Date()));
    timer.schedule(new TimerTask() {
        @Override
        public void run() {
            try {
                Thread.sleep(5000);
            } catch (Exception e) {
                e.printStackTrace();
            }
            System.out.println("schedule1当前时间为:" + sdf.format(new Date()));
        }
    }, new Date(System.currentTimeMillis() + 2 * 1000), 2 * 1000);

    timer.schedule(new TimerTask() {
        @Override
        public void run() {
            System.out.println("schedule2当前时间为:" + sdf.format(new Date()));
        }
    }, new Date(System.currentTimeMillis() + 2 * 1000), 2 * 1000);
}

// 输出如下,按照正常的猜想,应该是这样的
// 1 当前时间为 n,则 n + 2 后执行任务1、任务2
// 2 n + 4 时,再执行任务1、任务2,循环此步骤
// 但结果却是,原因出在 Timer的本质是单线程执行
// n + 7 执行任务1、任务2
// n + x 执行任务x,完全乱了逻辑
main当前时间为:2021-03-21 18:04:55
schedule1当前时间为:2021-03-21 18:05:02
schedule2当前时间为:2021-03-21 18:05:02

schedule1当前时间为:2021-03-21 18:05:07
schedule1当前时间为:2021-03-21 18:05:12
schedule2当前时间为:2021-03-21 18:05:12
schedule1当前时间为:2021-03-21 18:05:17
schedule1当前时间为:2021-03-21 18:05:22
schedule2当前时间为:2021-03-21 18:05:22
schedule1当前时间为:2021-03-21 18:05:27
schedule1当前时间为:2021-03-21 18:05:32
schedule2当前时间为:2021-03-21 18:05:32
schedule1当前时间为:2021-03-21 18:05:37
- 验证对于运行时异常不友好。
private static void test3() {
    // 测试对运行时异常不友好
    Timer timer = new Timer("定时任务timer", false);
    System.out.println("main当前时间为:" + sdf.format(new Date()));
    timer.schedule(new TimerTask() {
        @Override
        public void run() {
            System.out.println("schedule1当前时间为:" + sdf.format(new Date()));
        }
    }, new Date(System.currentTimeMillis() + 2 * 1000), 2 * 1000);

    timer.schedule(new TimerTask() {
        @Override
        public void run() {
            System.out.println("schedule2当前时间为:" + sdf.format(new Date()));
            throw new RuntimeException();
        }
    }, new Date(System.currentTimeMillis() + 3 * 1000), 2 * 1000);
}

// 输出如下,解决办法就是显式捕捉即可
main当前时间为:2021-03-21 18:14:40
schedule1当前时间为:2021-03-21 18:14:42
schedule2当前时间为:2021-03-21 18:14:43

Deprecated Gradle features were used in this build, making it incompatible with Gradle 7.0.
Exception in thread "定时任务timer" java.lang.RuntimeException
	at rockermq.schedule.TimerTest$6.run(TimerTest.java:80)
	at java.util.TimerThread.mainLoop(Timer.java:555)
	at java.util.TimerThread.run(Timer.java:505)
2、ScheduledExecutorService
相比较Timer的使用,ScheduledExecutorService是推荐的使用类。它的核心地方,也就是Timer的痛点之处,有了反面例子,那么正面角色也就好理解了。
1、接口方法
// ScheduledExecutorService scheduledExecutorService = Executors.newScheduledThreadPool(1);
// 其中具体的实现类为 ScheduledThreadPoolExecutor,后面均以类 ScheduledThreadPoolExecutor 为例
public interface ScheduledExecutorService extends ExecutorService {

    public ScheduledFuture<?> schedule(Runnable command,
                                       long delay, TimeUnit unit);

    public <V> ScheduledFuture<V> schedule(Callable<V> callable,
                                           long delay, TimeUnit unit);

    public ScheduledFuture<?> scheduleAtFixedRate(Runnable command,
                                                  long initialDelay,
                                                  long period,
                                                  TimeUnit unit);

    public ScheduledFuture<?> scheduleWithFixedDelay(Runnable command,
                                                     long initialDelay,
                                                     long delay,
                                                     TimeUnit unit);
}
接口方法很简单,甚至抛弃了Timer中对于特定Date的运行支持,而完全采用固定延迟 + 固定周期。这里的难点是融合线程池知识,如果对线程池了解不深,就容易陷入盲区。
2、任务生产
/**
 * Creates a new {@code ScheduledThreadPoolExecutor} with the
 * given core pool size.
 *
 * @param corePoolSize the number of threads to keep in the pool, even
 *        if they are idle, unless {@code allowCoreThreadTimeOut} is set
 * @throws IllegalArgumentException if {@code corePoolSize < 0}
 */
// 注意这里的 new DelayedWorkQueue
public ScheduledThreadPoolExecutor(int corePoolSize) {
    super(corePoolSize, Integer.MAX_VALUE, 0, NANOSECONDS,
          new DelayedWorkQueue());
}

/**
 * Specialized delay queue. To mesh with TPE declarations, this
 * class must be declared as a BlockingQueue<Runnable> even though
 * it can only hold RunnableScheduledFutures.
 */
// ScheduledThreadPoolExecutor内部类
static class DelayedWorkQueue extends AbstractQueue<Runnable>
    implements BlockingQueue<Runnable> {
    // 省略其他
}

/**
 * Main execution method for delayed or periodic tasks.  If pool
 * is shut down, rejects the task. Otherwise adds task to queue
 * and starts a thread, if necessary, to run it.  (We cannot
 * prestart the thread to run the task because the task (probably)
 * shouldn't be run yet.)  If the pool is shut down while the task
 * is being added, cancel and remove it if required by state and
 * run-after-shutdown parameters.
 *
 * @param task the task
 */
// 来自类 ScheduledThreadPoolExecutor
private void delayedExecute(RunnableScheduledFuture<?> task) {
    if (isShutdown())
        reject(task);
    else {
        // 这里加入了任务
        // 注意,这里的延迟队列是特制,属于内部类,外面不能访问
        super.getQueue().add(task);
        if (isShutdown() &&
            !canRunInCurrentRunState(task.isPeriodic()) &&
            remove(task))
            task.cancel(false);
        else
            // 预热核心线程
            ensurePrestart();
    }
}
至此,任务以加入任务队列,等待消费。
3、任务消费
/**
 * Performs blocking or timed wait for a task, depending on
 * current configuration settings, or returns null if this worker
 * must exit because of any of:
 * 1. There are more than maximumPoolSize workers (due to
 *    a call to setMaximumPoolSize).
 * 2. The pool is stopped.
 * 3. The pool is shutdown and the queue is empty.
 * 4. This worker timed out waiting for a task, and timed-out
 *    workers are subject to termination (that is,
 *    {@code allowCoreThreadTimeOut || workerCount > corePoolSize})
 *    both before and after the timed wait, and if the queue is
 *    non-empty, this worker is not the last thread in the pool.
 *
 * @return task, or null if the worker must exit, in which case
 *         workerCount is decremented
 */
// 来自类 ThreadPoolExecutor
// 线程池内部逻辑,主线程会轮询调用这个方法,以从任务队列消费任务
private Runnable getTask() {
    boolean timedOut = false; // Did the last poll() time out?

    for (;;) {
        int c = ctl.get();
        int rs = runStateOf(c);

        // Check if queue empty only if necessary.
        if (rs >= SHUTDOWN && (rs >= STOP || workQueue.isEmpty())) {
            decrementWorkerCount();
            return null;
        }

        int wc = workerCountOf(c);

        // Are workers subject to culling?
        boolean timed = allowCoreThreadTimeOut || wc > corePoolSize;

        if ((wc > maximumPoolSize || (timed && timedOut))
            && (wc > 1 || workQueue.isEmpty())) {
            if (compareAndDecrementWorkerCount(c))
                return null;
            continue;
        }

        try {
            // 注意这里有一个逻辑
            Runnable r = timed ?
                // 同take无限等待不同,这个指定了最大等待时间,超过了返回null
                workQueue.poll(keepAliveTime, TimeUnit.NANOSECONDS) :
            	// 尝试从延迟队列获取并移除头部元素,如果没有符合条件的则等待,直到可以获取到下一个
                workQueue.take();
            if (r != null)
                return r;
            timedOut = true;
        } catch (InterruptedException retry) {
            timedOut = false;
        }
    }
}

// 来自类 DelayedWorkQueue
public RunnableScheduledFuture<?> take() throws InterruptedException {
    final ReentrantLock lock = this.lock;
    lock.lockInterruptibly();
    try {
        for (;;) {
            RunnableScheduledFuture<?> first = queue[0];
            // 没有则等待
            if (first == null)
                available.await();
            else {
                // 获取第一个任务延迟等待
                long delay = first.getDelay(NANOSECONDS);
                if (delay <= 0)
                    // 立即执行
                    return finishPoll(first);
                first = null; // don't retain ref while waiting
                if (leader != null)
                    available.await();
                else {
                    Thread thisThread = Thread.currentThread();
                    leader = thisThread;
                    try {
                        // 同Timer,等待特定时间
                        available.awaitNanos(delay);
                    } finally {
                        if (leader == thisThread)
                            leader = null;
                    }
                }
            }
        }
    } finally {
        if (leader == null && queue[0] != null)
            available.signal();
        lock.unlock();
    }
}
4、总结
其实也没啥好总结的,大概说下吧:ScheduledThreadPoolExecutor依托于线程池 + 延时队列技术,变相地为Timer引入了多线程,以解决了Timer的不足之处。如下是几段简单的代码演示
/**
 * 测试 基本使用
 */
private static void test1() {
    ScheduledExecutorService scheduledExecutorService = Executors.newScheduledThreadPool(1);
    scheduledExecutorService.schedule(new Runnable() {
        @Override
        public void run() {
            System.out.println(new Date());
        }
    }, 1, TimeUnit.SECONDS);
}

/**
 * 测试 断点位置
 */
private static void test2() {
    ScheduledThreadPoolExecutor scheduledExecutorService = new ScheduledThreadPoolExecutor(1);
    scheduledExecutorService.scheduleAtFixedRate(new Runnable() {
        @Override
        public void run() {
            System.out.println(new Date());
        }
    }, 1, 2, TimeUnit.SECONDS);
}
四、Linux下的5种IO模型
引用链接:https://zhuanlan.zhihu.com/p/127170201、https://www.zhihu.com/question/32163005
1、几个系统调用函数
recvfrom Linux系统提供给用户用于接收网络IO的系统接口。从套接字上接收一个消息,可同时应用于面向连接和无连接的套接字。
如果此系统调用返回值<0,并且 errno为EWOULDBLOCK或EAGAIN(套接字已标记为非阻塞,而接收操作被阻塞或者接收超时 )时,连接正常,阻塞接收数据(这很关键,前4种IO模型都设计此系统调用)。
select select系统调用允许程序同时在多个底层文件描述符上,等待输入的到达或输出的完成。以数组形式存储文件描述符,32位机器默认1024个,64位机器默认2048个。当有数据准备好时,无法感知具体是哪个流OK了,所以需要一个一个的遍历,函数的时间复杂度为O(n)。
poll 以链表形式存储文件描述符,没有长度限制(而select有长度限制,注意数组和链表的区别)。本质与select相同,函数的时间复杂度也为O(n)。
epoll 是基于事件驱动的,如果某个流准备好了,会以事件通知,知道具体是哪个流,因此不需要遍历,函数的时间复杂度为O(1)。
sigaction 用于设置对信号的处理方式,也可检验对某信号的预设处理方式。Linux使用SIGIO信号来实现IO异步通知机制。
2、5种IO模型
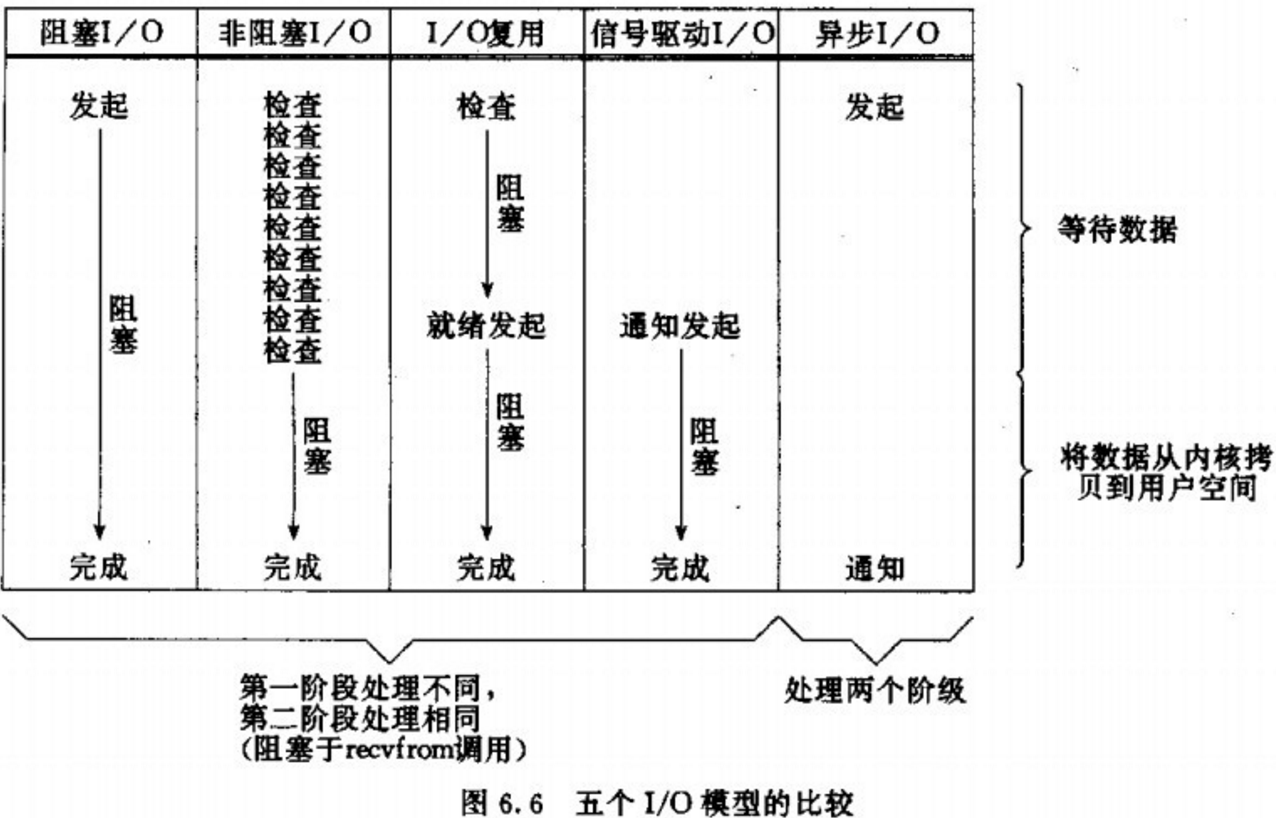
学习过操作系统的知识后,可以知道:不管是网络IO还是磁盘IO,对于读操作而言,都是等到网络的某个数据分组到达后/数据准备好后,将数据拷贝到内核空间的缓冲区中,再从内核空间拷贝到用户空间的缓冲区。
口头说明以 妈妈让我去厨房烧一锅子水,然后拿热水下饺子为例(我代指一个进程,水开了代指IO准备就绪,下饺子代指进程读取/使用IO数据)。
1、阻塞IO
-
书面说明:阻塞IO的执行过程是进程进行系统调用,等待内核将数据准备好并复制到用户态缓冲区后,进程放弃使用CPU并一直阻塞在此,直到数据准备好。
-
口头说明:水只要没烧开,我就干瞪眼看着这个锅,其他什么都不做。

2、非阻塞IO
- 书面说明:应用程序询问内核是否有数据准备好。如果就绪,就进行拷贝操作(此时阻塞);如果未就绪,就不阻塞程序,内核直接返回未就绪的返回值,等待用户程序下一个轮询。
- 口头说明:我可以干些别的,但需要快速、频繁地来看下水是否开了。
- 相比较于阻塞IO的优点:由于阻塞IO阻塞于IO数据的读取,从而放弃CPU使用,直到下一次CPU时间片;而非阻塞IO轮询IO数据,当发现IO数据没到时,可以利用CPU剩余时间片去做别的事情。
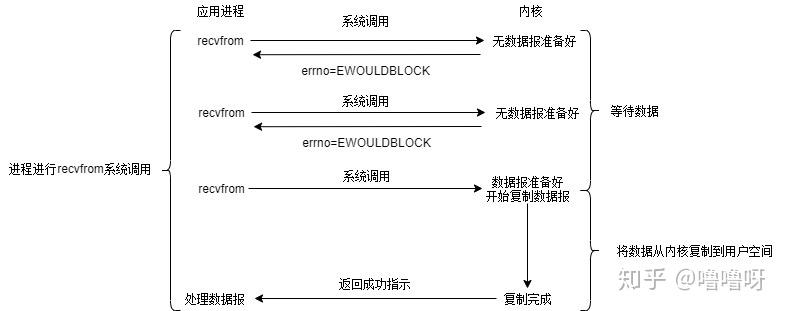 非阻塞IO模型
3、IO多路复用
排了很长的队,终于轮到我支付后,拿到了一张小票,上面有号次。当全家桶出炉后,会喊相应的号次来取。KFC营业员小姐姐打小票出号次的动作相当于操作系统多开了个线程,专门接收客户端的连接。我只关注叫到的是不是我的号,因此程序还需在服务端注册我想监听的事件类型。
多路复用一般都是用于网络IO,服务端与多个客户端的建立连接。下面是神奇的多路复用执行过程:
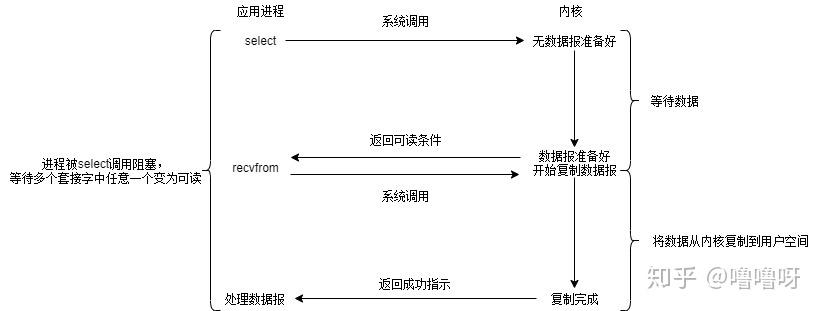 IO多路复用模型
相比于阻塞IO模型,多路复用只是多了一个select/poll/epoll函数。select函数会不断地轮询自己所负责的文件描述符/套接字的到达状态,当某个套接字就绪时,就对这个套接字进行处理。
select负责轮询等待(这里可以替换为poll或epoll,它们之间的区别见前文,所以linux下面尽量使用epool),recvfrom负责拷贝。当用户进程调用该select,select会监听所有注册好的IO,如果所有IO都没注册好,调用进程就阻塞。
对于客户端来说,一般感受不到阻塞,因为请求来了,可以放到线程池里执行;但对于执行select的操作系统而言,是阻塞的,需要阻塞地等待某个套接字变为可读。
IO多路复用其实是阻塞在select,poll,epoll这类系统调用上的,复用的是执行select,poll,epoll的线程。
4、信号驱动IO
跑KFC嫌麻烦,刚好有个会员,直接点份外卖,美滋滋。当外卖送达时,会收到取餐电话(信号)。在收到取餐电话之前,我可以愉快地吃鸡或者学习。
当数据报准备好的时候,内核会向应用程序发送一个信号,进程对信号进行捕捉,并且调用信号处理函数来获取数据报。
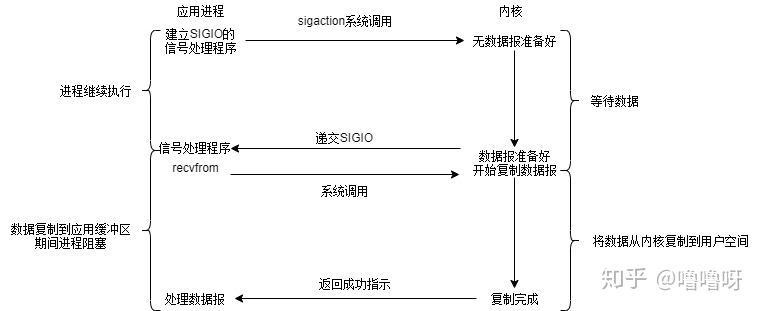 信号驱动IO模型
该模型也分为两个阶段:
- 数据准备阶段:未阻塞,当数据准备完成之后,会主动的通知用户进程数据已经准备完成,对用户进程做一个回调。
- 数据拷贝阶段:阻塞用户进程,等待数据拷贝。
5、异步IO
此时科技的发展已经超乎想象了,外卖机器人将全家桶自动送达并转换成营养快速注入我的体内,同时还能得到口感的满足。注入结束后,机器人会提醒我注入完毕。在这个期间我可以放心大胆的玩,甚至注射的时候也不需要停下来!
类比一下,就是用户进程发起系统调用后,立刻就可以开始去做其他的事情,然后直到I/O数据准备好并复制完成后,内核会给用户进程发送通知,告诉用户进程操作已经完成了。
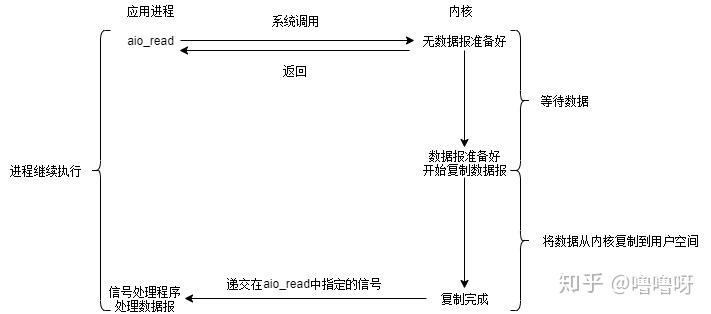 异步IO模型
特点:此时科技的发展已经超乎想象了,外卖机器人将全家桶自动送达并转换成营养快速注入我的体内,同时还能得到口感的满足。注入结束后,机器人会提醒我注入完毕。在这个期间我可以放心大胆的玩,甚至注射的时候也不需要停下来!
类比一下,就是用户进程发起系统调用后,立刻就可以开始去做其他的事情,然后直到I/O数据准备好并复制完成后,内核会给用户进程发送通知,告诉用户进程操作已经完成了。
异步I/O执行的两个阶段**都不会阻塞读写操作,**由内核完成。完成后内核将数据放到指定的缓冲区,通知应用程序来取。
6、比较
各个IO Model的比较如图所示
五、netty
1、netty为什么选择nio
这里以一个简单的回文服务器作为例子(客户端发送什么,服务端返回什么),分别测试bio、nio、aio的性能,具体测试代码如下
1、bio
服务端代码
public class BIOServer {

    public void initServer () throws IOException {
        ServerSocket serverSocket = new ServerSocket(2222);
        System.out.println("服务器主线程等待连接....");
        AtomicInteger i = new AtomicInteger(0);
        Socket client;
        while ((client = serverSocket.accept()) != null) {
            i.incrementAndGet();
            Socket finalClient = client;
            new Thread(new Runnable() {
                @Override
                public void run() {
                    try {
                        byte[] bytes = new byte["hello".getBytes().length];
                        while (finalClient.getInputStream().read(bytes) != -1) {
                            finalClient.getOutputStream().write(bytes);
                            finalClient.close();
                            return;
                        }
                    } catch (IOException e) {
                        e.printStackTrace();
                    }
                }
            }, "服务器线程" + i.get()).start();
        }
    }
}

public class BIO {

    public static void main(String[] args) throws IOException, InterruptedException {
        new Thread(new Runnable() {
            @Override
            public void run() {
                try {
                    new BIOServer().initServer();
                } catch (Exception e) {
                    e.printStackTrace();
                }
            }
        }).start();
        Thread.sleep(1000);
        new Client().beginTest(2222);
    }
}
客户端代码(后面将不再重复)
public class Client {

    private int number = 10;

    public Client() {
    }

    public Client(int thread) {
        this.number = thread;
    }

    private void initClient(int port) throws IOException, InterruptedException {
        Socket socket = new Socket(InetAddress.getLocalHost(), port);
        PrintWriter pw = new PrintWriter(socket.getOutputStream());
        BufferedReader br = new BufferedReader(new InputStreamReader(socket.getInputStream()));

        String req = "hello";
        pw.print(req);
        pw.flush();

        String temp;
        while ((temp = br.readLine()) != null) {
            System.out.println("收到服务端回声消息:" + temp);
        }
        pw.close();
    }

    public void beginTest(int port) throws InterruptedException {
        AtomicInteger atomicInteger = new AtomicInteger(0);
        ThreadPoolExecutor threadPoolExecutor = new ThreadPoolExecutor(number, number + 10, 10, TimeUnit.SECONDS,
                new ArrayBlockingQueue<>(number), new ThreadFactory() {
            @Override
            public Thread newThread( Runnable r) {
                return new Thread(r, "线程" + (number - atomicInteger.incrementAndGet()));
            }
        });
        int preparedThread = threadPoolExecutor.prestartAllCoreThreads();
        System.out.println("线程成功预热数:" + preparedThread);

        long beginTime = System.currentTimeMillis();
        CyclicBarrier barrier = new CyclicBarrier(number);
        CountDownLatch countDownLatch = new CountDownLatch(number);

        for (int i = 0; i < number; i++) {
            threadPoolExecutor.execute(new Runnable() {
                @Override
                public void run() {
                    try {
                        barrier.await();
                        initClient(port);
                    } catch (IOException | InterruptedException | BrokenBarrierException e) {
                        e.printStackTrace();
                    } finally {
                        countDownLatch.countDown();
                    }
                }
            });
        }
        countDownLatch.await();
        System.out.println(number + "线程连接服务器,总耗时: " + (System.currentTimeMillis() - beginTime) + " ms");
        System.exit(0);
    }
}
2、nio
public class NIOServer {

    private Selector selector;

    public void initServer(int port) throws IOException{
        // 打开ServerSocket通道
        ServerSocketChannel serverSocketChannel = ServerSocketChannel.open();
        serverSocketChannel.configureBlocking(false);
        serverSocketChannel.socket().bind(new InetSocketAddress(port));

        // 获取一个选择器
        this.selector = Selector.open();
        // 将通道管理器与该通道进行绑定,并为该通道注册SelectionKey.OP_ACCEPT事件
        // 注册事件后,当该事件触发时会使selector.select()返回,
        // 否则selector.select()一直阻塞
        serverSocketChannel.register(this.selector, SelectionKey.OP_ACCEPT);
        listen();
    }

    public void listen() throws IOException{
        System.out.println("启动服务器!");
        while (true) {
            // select()方法一直阻塞直到有注册的通道准备好了才会返回
            selector.select();
            Iterator<?> iterator = selector.selectedKeys().iterator();
            while (iterator.hasNext()) {
                SelectionKey key = (SelectionKey) iterator.next();
                // 删除已选的key,防止重复处理
                iterator.remove();
                handler(key);
            }
        }
    }

    public void handler(SelectionKey key)throws IOException{
        if (key.isAcceptable()) {
            handlerAccept(key);
        }else if (key.isReadable()){
            handlerRead(key);
        }else if (key.isWritable()){
            System.out.println("can write!");
        }else if (key.isConnectable()){
            System.out.println("is connectable");
        }
    }


    public void handlerAccept(SelectionKey key) throws IOException{
        // 从SelectionKey中获取ServerSocketChannel
        ServerSocketChannel server = (ServerSocketChannel) key.channel();
        // 获取SocketChannel
        SocketChannel socketChannel = server.accept();
        // 设置成非阻塞
        socketChannel.configureBlocking(false);
        // 为socketChannel通道建立 OP_READ 读操作,使客户端发送的内容可以被读到
        socketChannel.register(selector, SelectionKey.OP_READ);
    }

    public void handlerRead(SelectionKey key)throws IOException{
        SocketChannel socketChannel = (SocketChannel) key.channel();
        // 创建读取缓冲区
        ByteBuffer byteBuffer = ByteBuffer.allocate(512);
        // 从通道读取可读取的字节数
        try {
            int readCount = socketChannel.read(byteBuffer);
            if (readCount > 0) {
                byte[] data = byteBuffer.array();
                ByteBuffer outBuffer = ByteBuffer.wrap(data);
                socketChannel.write(outBuffer);
                socketChannel.close();
            } else {
                System.out.println("客户端异常退出");
            }
        } catch (IOException e) {
            key.cancel();
        }
    }
}

public class NIO {

    public static void main(String[] args) throws IOException, InterruptedException {
        new Thread(new Runnable() {
            @Override
            public void run() {
                try {
                    new NIOServer().initServer(4444);
                } catch (Exception e) {
                    e.printStackTrace();
                }
            }
        }).start();
        Thread.sleep(1000);
        new Client().beginTest(4444);
    }
}
3、aio
public class AIOServer {

    private static final ExecutorService executorService = Executors.newFixedThreadPool(200);

    public void init() throws Exception {
        AsynchronousChannelGroup group = AsynchronousChannelGroup.withThreadPool(executorService);
        AsynchronousServerSocketChannel server = AsynchronousServerSocketChannel.open(group);
        server.bind(new InetSocketAddress(3333));
        server.accept(null, new CompletionHandler<AsynchronousSocketChannel, Object>() {
            @Override
            public void completed(AsynchronousSocketChannel client, Object attachment) {
                server.accept(null, this);
//                try {
//                    System.out.println(Thread.currentThread().getName() + ":服务器与客户端" + client.getRemoteAddress() + "建立连接");
//                } catch (IOException e) {
//                    e.printStackTrace();
//                }
                ByteBuffer buffer = ByteBuffer.allocate("hello".getBytes().length);
                client.read(buffer, buffer, new CompletionHandler<Integer, ByteBuffer>() {
                    @Override
                    public void completed(Integer index, ByteBuffer buffer) {
                        try {
                            buffer.flip();
                            client.write(buffer).get();//这个是异步的,一定要用get 确保执行结束 才能clear
                            client.close();
                        } catch (Exception e) {
                            e.printStackTrace();
                        }
                    }
                    @Override
                    public void failed(Throwable exc, ByteBuffer attachment) {
                        System.out.println(exc.getMessage());
                    }
                });
            }

            @Override
            public void failed(Throwable exc, Object attachment) {
                throw new RuntimeException(exc.getMessage());
            }
        });
    }
}

public class AIO {

    public static void main(String[] args) throws Exception {
        new Thread(new Runnable() {
            @Override
            public void run() {
                try {
                    new AIOServer().init();
                } catch (Exception e) {
                    e.printStackTrace();
                    return;
                }
            }
        }, "服务端线程").start();
        Thread.sleep(1000);
        if (args.length != 0) {
            new Client(Integer.parseInt(args[0])).beginTest(3333);
        } else {
            new Client().beginTest(3333);
        }
    }
}
4、测试数据
测试脚本如下
#!/bin/bash
# 该脚本主要用于代替手工执行
# @author HK
# @date 2020-10-22
# @version 1.0

readonly bash_path=""
readonly from_dir=""
readonly to_dir="/home/hk-pc/ABC/classes"
readonly base_path="/home/hk-pc/JavaSpace/newxiaokui/k-study/k-java/src/main/java"
readonly log_file="${to_dir}/output.txt"

# 进入工作目录
cd ${base_path} || {
  echo "无法进入java目录"
  exit 1
}
# 编译java文件 -d 指定class输出的目录
javac -d "${to_dir}" netty/io/*.java
# 再进入编译后的class目录
cd "${to_dir}" || {
  echo "无法进入java目录"
  exit 1
}
# 准备日志文件,输出记录
>${log_file}
echo "日志输出至文件 ${log_file}"

# 测试次数,然后再取平均值
readonly times=(50)
# 线程测试数量
readonly threads=(50 100 250 500 1000 1500 2000 3000)

# 方法第一个入参为类型,可选值为bio、nio、aio,必传
# 方法第二个入参为执行次数
# 方法第三个入参为线程数
function run_test() {
  io_type="$1"
  run_times="$2"
  thread_count="$3"
  sum_time=0
  average_time=0
  for ((i = 0; i < ${run_times}; i++)); do
    if test "$io_type" = 'bio'; then
      result=$(java netty/io/BIO "$thread_count" | tail -n 1)
    elif test "$io_type" = 'nio'; then
      result=$(java netty/io/NIO "$thread_count" | tail -n 1)
    elif test "$io_type" = 'aio'; then
      result=$(java netty/io/AIO "$thread_count" | tail -n 1)
    else
      echo "非法输入" "$2"
      exit 1
    fi
    # echo "$result" | tee -a ${log_file}
    temp="${result#* }"
    consume_time="${temp%% *}"
    sum_time=$(expr $sum_time + $consume_time)
  done
  average_time=$(expr $sum_time / $run_times)
  echo "$io_type" "线程数" "$thread_count" "  运行次数" "$run_times" "  平均耗时" "$average_time" "ms" | tee -a ${log_file}
}

echo "$(date) "| tee -a ${log_file}
# 最好用这种变量,那种用两个变量遍历数组索引的方式有问题
for i in "${times[@]}";do
  for j in "${threads[@]}";do
    run_test bio "$i" "$j"
    run_test nio "$i" "$j"
    run_test aio "$i" "$j"
  done
done
echo "$(date) "| tee -a ${log_file}
测试结果如下
2020年 11月 11日 星期三 16:26:45 CST
bio 线程数 50   运行次数 50   平均耗时 71 ms  # 相差不大
nio 线程数 50   运行次数 50   平均耗时 65 ms
aio 线程数 50   运行次数 50   平均耗时 78 ms
bio 线程数 100   运行次数 50   平均耗时 1076 ms  # 相差不大
nio 线程数 100   运行次数 50   平均耗时 1071 ms
aio 线程数 100   运行次数 50   平均耗时 1079 ms
bio 线程数 250   运行次数 50   平均耗时 2227 ms  # 相差不大
nio 线程数 250   运行次数 50   平均耗时 2109 ms
aio 线程数 250   运行次数 50   平均耗时 2251 ms
bio 线程数 500   运行次数 50   平均耗时 2854 ms  # 有略微差距
nio 线程数 500   运行次数 50   平均耗时 3147 ms
aio 线程数 500   运行次数 50   平均耗时 3436 ms
bio 线程数 1000   运行次数 50   平均耗时 3720 ms  # 差距稍稍明显
nio 线程数 1000   运行次数 50   平均耗时 4515 ms
aio 线程数 1000   运行次数 50   平均耗时 4280 ms
bio 线程数 1500   运行次数 50   平均耗时 5091 ms  # 数据不合理啊
nio 线程数 1500   运行次数 50   平均耗时 6173 ms
aio 线程数 1500   运行次数 50   平均耗时 4904 ms


2020年 11月 02日 星期一 11:35:12 CST
bio 线程数 50   运行次数 50   平均耗时 80 ms  # 相差不大
nio 线程数 50   运行次数 50   平均耗时 67 ms
aio 线程数 50   运行次数 50   平均耗时 81 ms
bio 线程数 100   运行次数 50   平均耗时 1074 ms  # 相差不大
nio 线程数 100   运行次数 50   平均耗时 1071 ms
aio 线程数 100   运行次数 50   平均耗时 1078 ms
bio 线程数 250   运行次数 50   平均耗时 1928 ms  # 相差不大,bio最好
nio 线程数 250   运行次数 50   平均耗时 2138 ms
aio 线程数 250   运行次数 50   平均耗时 2201 ms
bio 线程数 500   运行次数 50   平均耗时 2772 ms  # 相差不大,bio最好
nio 线程数 500   运行次数 50   平均耗时 3081 ms
aio 线程数 500   运行次数 50   平均耗时 3117 ms
bio 线程数 1000   运行次数 50   平均耗时 4499 ms  # 相差不大,nio自豪
nio 线程数 1000   运行次数 50   平均耗时 4161 ms
aio 线程数 1000   运行次数 50   平均耗时 4515 ms
bio 线程数 1500   运行次数 50   平均耗时 5739 ms  # 相差不大,nio最好
nio 线程数 1500   运行次数 50   平均耗时 4985 ms
aio 线程数 1500   运行次数 50   平均耗时 5236 ms
bio 线程数 2000   运行次数 50   平均耗时 5671 ms  # 相差不大,nio最好
nio 线程数 2000   运行次数 50   平均耗时 4869 ms
aio 线程数 2000   运行次数 50   平均耗时 6358 ms
bio 线程数 3000   运行次数 50   平均耗时 10016 ms  # nio效果明显
nio 线程数 3000   运行次数 50   平均耗时 6223 ms
以上数据为个人笔记本运行测试结果,限于测试条件,结果仅供参考(测一次要一个多小时),数据证明大致反应了一个事实(马后炮):
- 并发量不大时(1000以下吧),三种io差别不大(分别对于linux中的同步阻塞io、io多路复用、异步io)
- 并发量中等时(1500以上吧),bio应付起来稍稍有点吃力
- 并发量大时(5000以上吧),就不应该考虑bio了,而nio与aio看不出什么明显优劣势,暂不表态
5、结果分析
NIO(Non-block input output),非阻塞模式IO。NIO主要有三大核心部分:Channel(通道),Buffer(缓冲区),Selector(选择器)。
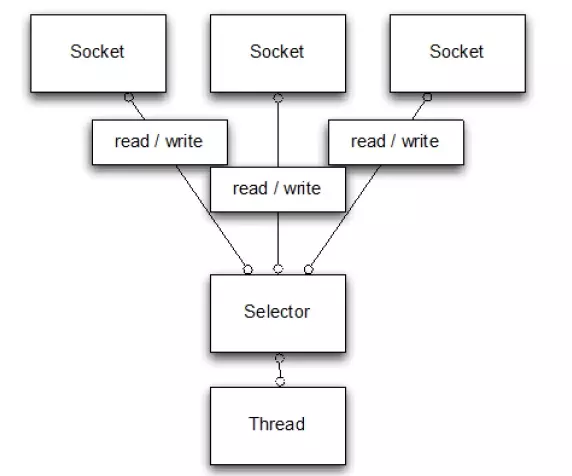
传统IO基于流进行操作的,而NIO基于Channel和Buffer进行操作,是面向缓存的,数据总是从通道读取到缓冲区中,或者从缓冲区写入到通道中。Selector(选择器)用于监听多个通道的事件(比如:连接打开,数据到达),当监听事件发生时,才去唤醒线程处理请求,而不必阻塞于外部的输入。
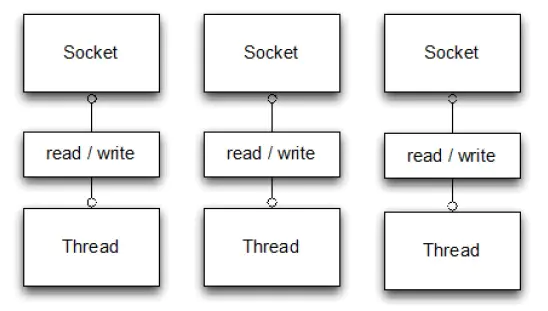
下面是BIO的处理流程,可以看到每个线程都阻塞在socket的读写,而不能去处理其他事情,白白浪费了CPU资源。
下面是NIO的处理流程,NIO区别于BIO的关键步骤在于有一个专门的Selector线程轮询socket发来的有效数据,然后将其交给相应的线程进行处理,这里少了一个等待客户端发生数据的时间。
BIO方式适用于连接数目比较小且固定的架构,这种方式对服务器资源要求比较高,并发局限于应用中,JDK1.4以前的唯一选择,但程序直观简单易理解。
NIO方式适用于连接数目多且连接比较短(轻操作)的架构,比如聊天服务器,并发局限于应用中,编程比较复杂,JDK1.4开始支持。
AIO方式使用于连接数目多且连接比较长(重操作)的架构,比如相册服务器,充分调用OS参与并发操作,编程比较复杂,JDK7开始支持。
2、netty为什么快
1、基于nio
2、
3、
未完待续。
总访问次数: 243次, 一般般帅 创建于 2021-02-28, 最后更新于 2021-05-08
 欢迎关注微信公众号,第一时间掌握最新动态!